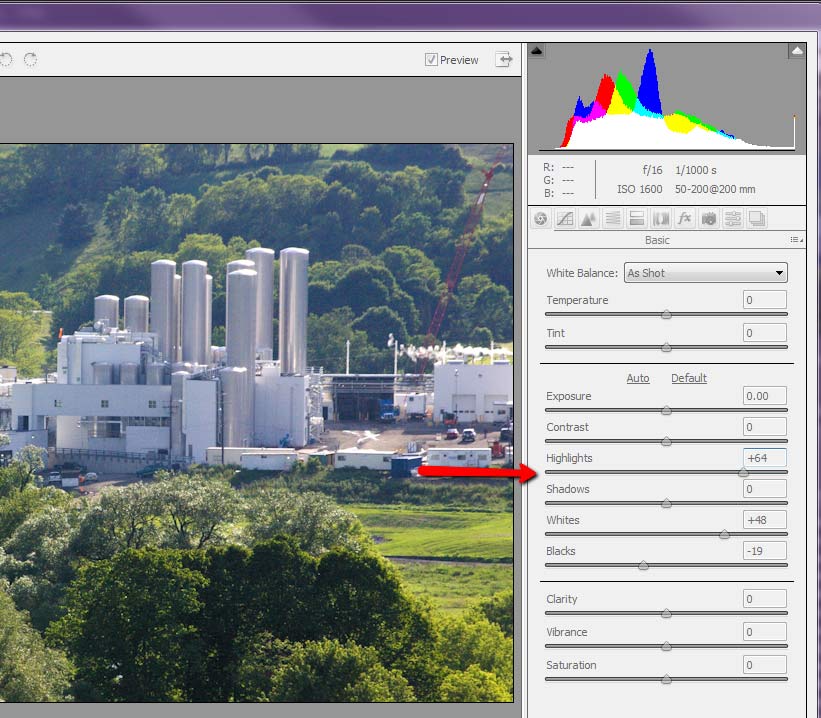
If you are a photographer that works with RAW images. The Camera Raw feature in Adobe Photoshop CS6 has been updated with features that are both user-friendly and functional. Camera Raw has been updated to Version 7.0. It offers further image processing functions than previous versions of Camera Raw.
The primary feature which has been changed in Version 7.0. The Basic Panel controls provide extensive modification capabilities.
Thanks to the sliders and other controls which allow for a broad range of photo adjustments. Start getting familiar with Camera Raw 7.0, simply select a raw image in Bridge. Click on the Image to open the Camera Raw panel. Or you can select the Ctrl key. Then, the R key on your keyboard to open the Camera Raw dialog box.

Click on the left icon to open the Basic Panel which displays the slider features. All of the slider features are set directly in the center which makes it easier to start using.
Regardless of which slider you use, if you slide it to the right, it will lighten the image. When you slide it to the left, it will darken the image.
At the top of the Camera Raw Basic Panel, you will see a histogram that depicts your image. As you use each slider function, you will see the changes take place in the histogram. And the image itself as well.
Instead of starting with the top slider and working your way down. It is best to begin with the sliders that operate the blacks and whites for the photo.
These are the adjustments that will affect the far ends of the histogram. By defining these points at the onset, you can work with the other slider features more easily to create a balanced effect.

Once you have the black and white colors properly adjusted. Then, you can work with Highlight slider to brighten or darken the brighter tones in the photo.

Then, you can work with the Shadow slider. That way, you bring out the tones in different areas of the image without experiencing the flattening effect in the past versions of Camera Raw.

Once you have completed the previous image adjustments, you can work with the Clarity slider to bring out the sharpness of the image without getting the halo effect that often occurred with the previous versions of Camera Raw.
![]()
Using the Lens Correction Feature
Another enhanced feature in Photoshop CS6 is the Lens Correction option. This feature can be accessed by sliding over to the Lens Correction icon in the Camera Raw panel. Once you are in the panel simply place a check mark next to Enable Lens Correction.
In the past, this feature corrected distortion removed vignetting (reduction of saturation). And provided chromatic aberration which is a misalignment of pixels that happens when you are shooting with a wider angle lens.
The misalignment typically happens along the edges of the photo. When you turn on the Remove Chromatic Aberration by placing a check mark in the box it automatically removes the misalignment problem.
![]()
Point Curve for Color Correction
Another new feature is the Point Curve option located in the Tone Curve panel. You can access this feature by clicking on the Tone Curve icon and then clicking the Point tab in the new window. The new feature in the Point Curve option provides the ability to go into the Channel feature and make color corrections to a photo on a per channel basis.
As in the example shown below, if you want to add more warmth to the photo you simply choose the Blue channel and then slide the curve downward to add more warmth to the image. The advantage to this feature is you can add warmth to either the photo highlights or shadows or both using this customized feature.
![]()
Selective Adjustment
The Selective Adjustment feature allows you to work more accurately with high contrast images by being able to select the exact areas you want to modify and then you can work with color sliders for that specific area of the photo. The Selective Adjustment brush is accessed by clicking the Brush icon on the upper toolbar of the Camera Raw interface and selecting the area of the photo you want to modify. Also, when you click on the Brush icon the slider panel for adjusting that area of the photo automatically appears. Here you can adjust the temperature and tint, adjust the noise reduction and then simply make the modifications by stroking the tool over the specific area of the photo.

If you like the modification and edits you made to the image you can also save the Presets that you used to modify the photo under the Preset icon so you can access these settings again in the future.
Need Photoshop CS6 training? Checkout our online video training course for Photoshop CS6 with over 12 hours of videos.
The post Editing Images with Photoshop CS6 Camera Raw appeared first on Simon Sez IT.


